6. Manage
Learn navigate to use the exam attempt management table, sort, filter, view results and use exam controls to modify in progress or finished attempts
Use the exam attempt-management table to update attempts, send email and manage candidates both before and after they've submitted their attempt. Selected attempts have actions applied via the actions drop down

Attempts
For exam day management you'll want to keep track of the status of the exam attempts. The attempt management table will group statuses. You can access a students exam hall link at any time using the Exam link column.
Enrolled = User has an exam generated but they haven't started yet
Notified = User has been enrolled and emailed via the system about their exam
Pre-flight = Rosalyn proctored attempts only. User has clicked start exam and is in the process of downloading Rosalyn and running through their pre-exam checks. Attempts hasn't started at this stage
In progress = User has started the attempt (See Start-Complete column for times)
Submitted = User has submitted their exam attempt
Expired = User did not attempt to start the exam, the window has now closed
Revoked = This attempt is revoked and users cannot start it. If the attempt was revoked whilst in progress then users will no longer be able to continue

Different attempt states have different actions that can be performed:
Enrolled
Revoke, adjust Time, send email, lock / unlock, assign marker
Notified
Revoke, adjust time, send email, lock / unlock, assign marker
In progress
Revoke, close
Revoked
Send email, generate attempt, un-revoke
Submitted
Mark (finalise, release), email
Expired
Send email, revoke, adjust time
Locking
An exam attempt can also be locked which means a user cannot start until an admin or educator unlocks it for them. Select the attempt/s and use the Unlock attempt button

Submission information
Use the Submission type information column to see how an attempt was submitted.
Submitted by candidate = Candidate was in the attempt, submitted before the time ran out
Time out (candidate present) = Candidate was in the attempt, the timer ran out and it was submitted by the system
System submitted (candidate left) = Candidate had left the attempt, timer ran out while they were not present, the system closed it on behalf of the admin in a routine clean up process.
Manually closed by a moderator = An Educator/Manager or Admin selected and manually closed the attempt from the attempt management table

Notification emails
Synap has a default Registration email that when sent includes the candidates information, their specific attempt information to their set timezone in their set language. Included are the pre exam instructions this is where admins can customise the information sent. Else there is a custom message option if you want to send you're own registration email template.

See below for registration email template
5. ShareGenerate attempts and resits
From the attempt management table, you can either generate an attempt or issue a resit (depending on your exam set up) — and while both create a new attempt for a candidate, they work differently.
Generating an attempt creates a standalone attempt with no link back to any prior attempt; it doesn't draw on the exam's configured resit allowance, so it must be used carefully, as it can affect how attempt counts appear to the candidate.
Issuing a resit creates a new attempt that is explicitly tied to the candidate's original ("source") attempt: it inherits that attempt's exam window for reporting and scheduling purposes, uses whichever version of the exam is currently live at the time it's generated, and correctly increments the candidate's attempt counter against their originally configured allowance (e.g. showing 3/1 rather than resetting to 2/2)

Edit open windows & Time adjustments
Select an attempt and the timer action button to modify the open/close or overall timer on an attempt or multiple.

Attempts are given a global open/close window. Candidates will be given a set amount of time depending on the settings of the exam. You can modify each attempt to have a different open/close time or overall timer. Give users extra time on their exam papers or modify the close window for them.

You can re-open expired attempts using the adjust time exam control by changing the close time to be in the future.
Un-expire an attempt
If you've got users who have missed the exam start window and the exam has closed because the close window was met you can now select one or more of those attempts to 'un-expire' them by giving them a new open/close time independent from the one set at the exam level.

To update the start / close times on expired attempts, head over to the exam>users table and select the attempts. Then use the control panel to update timer

Revoke or close attempts
An attempt can be revoked in any state. An attempt can only be closed when it is not started or in progress.

Revoking an attempt means a user cannot start it. If the attempt was revoked whilst in progress then users will no longer be able to continue. The users results page for that attempt will let them know that the attempt has been revoked but not display any other information and the attempt won't appear on their insights page.
Closing an attempt is for in progress attempts you want to end but allow to be submitted sucessfully, helpful for untimed exams
Archiving attempts
Any attempt in any state can be archived this will hide attempts from the candidates list and from the markers inbox. Results stay valid and direct links continue to work. Recommended when exams are over to keep the attempt management table organised for example archiving all revoked attempts.
Close an Exam
If you wish to close an exam early or end the creation of attempts on an indefinite exam, use Synap's close exam feature. You'll find this button on the version management page, once clicked you'll get a warning that active attempts can still progress but no more attempts can be generated or started. Closing an exam will also revoke any not started attempts.
If you choose to cancel the exam instead, it will prevent newly added users having attempts generated but will not revoke existing, not started attempt.

Override score & grades
You can override the score, grade & points of an attempt even when it has been released or finalised. You can use this feature to moderate exams in the event grade boundaries change, if you need to take a 'bad' question into account in a users exam or if you want to deduct marks for a user being late etc. Select the attempt that is finalised or released and use the override results button

Once you've selected a result to override, a pop up modal will display the options to change the results. You can also use this functionality to leave an internal comment and regenerate certificates.

Click into any of the number entry boxes for score, points, credits or penalties and type the value you want to add / remove to that field. You can also use the up / down arrows. Hit return to confirm your selection, this will update any other fields affected by your entry (see below). To change the grade, simply select the grade you want to change the attempt to.
Changing the number of points, credits or penalties on an attempt will automatically update the overall score. If a change to the overall score means the attempt moves to a new grade boundary, this will also happen automatically.
You can view previous overrides and comments by clicking on the 'History' tab. You can click on the name of the user to be taken to the profile of the user who made the change. This can be useful for communicating with the user via the message function.

Reverting to original
After changing the results of an attempt, you can re-open the override results modal and choose to revert any of the results metrics to their original value by using the 'Revert to original' toggle. Again, reverting points and credits to their original value will affect the score, and changes to the score will affect the grade (where applicable).

Marking
Depending on your marking configuration you may need to assign markers from the attempt management table. To do so make sure markers are in the marker lists on the exam marking page. Select the attempt/s and use the assign marker button

Once selected a modal will open for the different available markers who can be assigned to attempt/s this list can be updated with markers added and removed. Use the 'all' tab to see all markers assigned.

Admins or educators with the correct permissions can mark directly from the attempt management table by selecting an attempt and using the Mark button to go straight to the marking page.

Admins and educators with the correct permissions can also view in progress or completed marks at any time by selecting an attempt and clicking the view button.

Unmarked - Attempt has been completed and is ready to be marked
In progress - Attempt is being marked / marking has been started
Completed - All questions in the attempt have been given marks, other admins and educators can make edits to these marks
Finalised - All questions in the attempt have been given marks, and it has been finalised. No more changes to marks at this point
Released - Marks have been released to students
For more details on managing marking and features please read our detailed guide below
Mark/Score attemptsProctoring
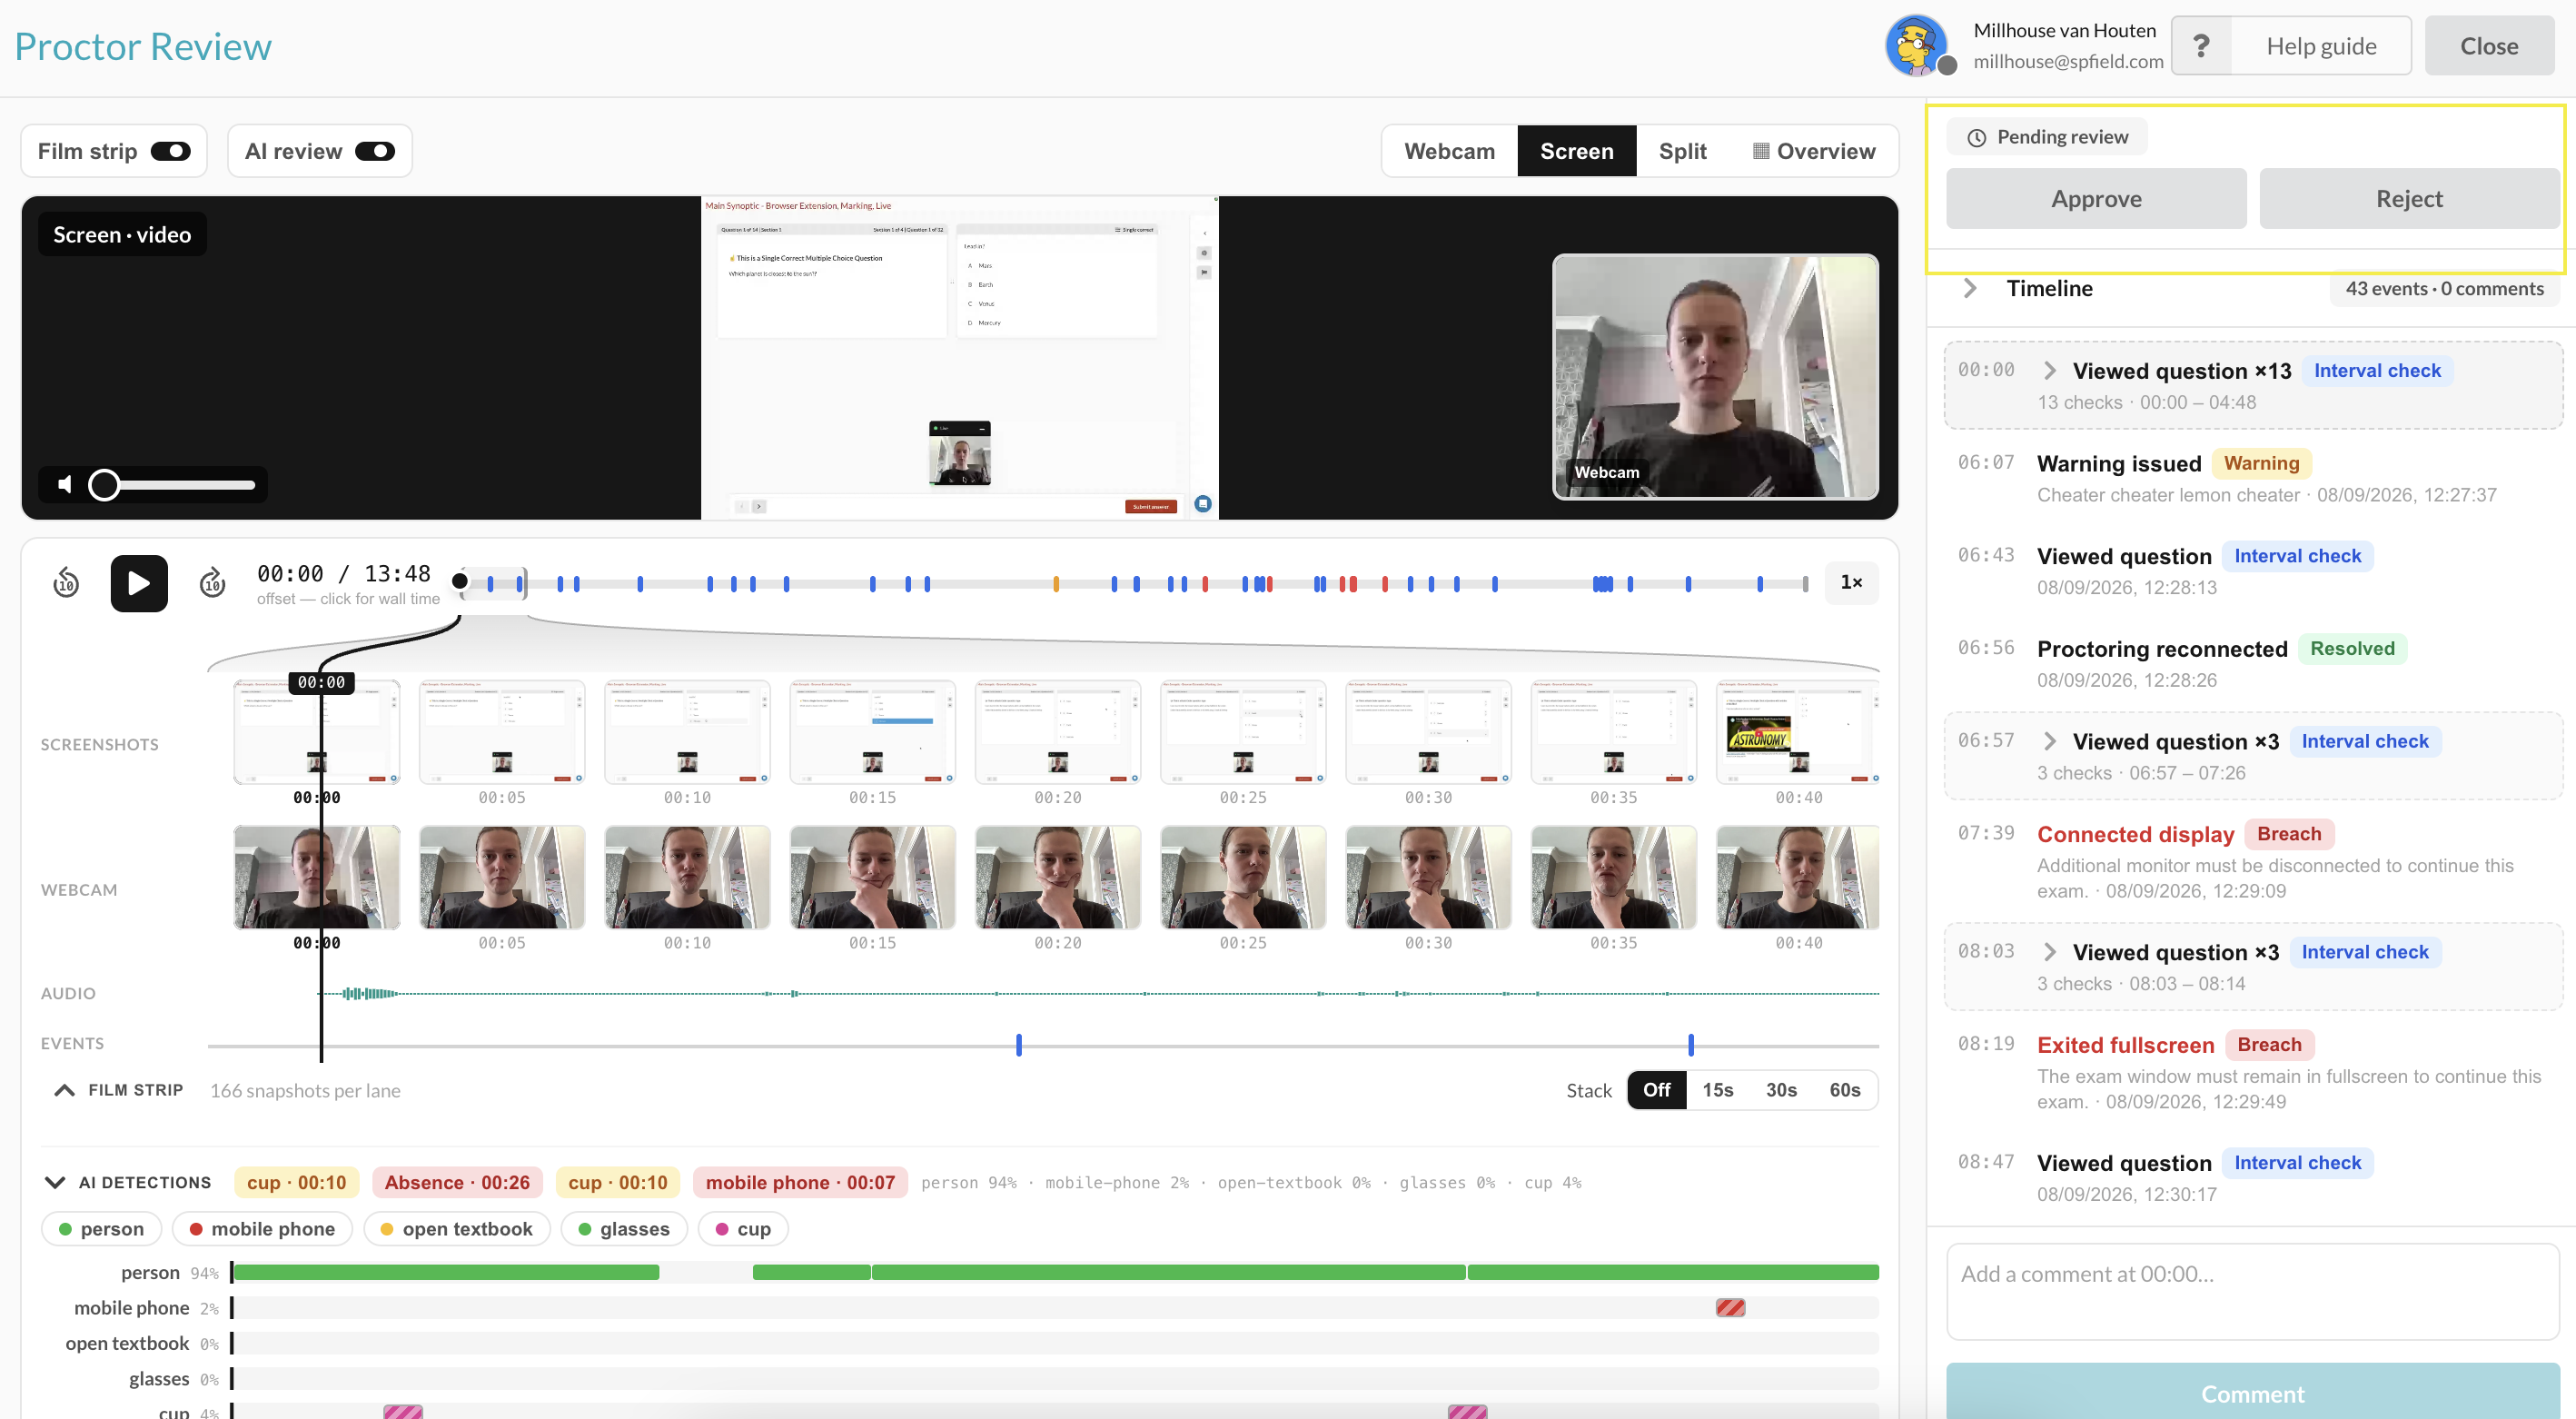
For Synoptic procotored exams the attempts management table will have additional columns depending on your installation and monitoring method selected, additional configs will decide whether or not attempts require a manual review or not. Select any attempt from the table and use the actions button > Proctor review to open the proctoring review UI.

From the proctroing review page you'll be shown the details of the session and be able to leave comments, and approve or reject the session which will show on the attempt management table

See our detailed guide below on reviewing synoptic sessions for more information and support
Review proctored sessionsRejected sessions will show as proctoring failed status on the table

Results
Releasing results
Any attempts with marks completed can be set to finalised and then released with the action buttons above the table. To release one or more results select all the attempts with a where the marks are finalised. Once selected use the exam controls and Release results button. This can be done individually or in bulk

Result page visibility
There are addition result page visibility options, to support releasing results for a ceratin amount of time for users. Select the individual or bulk attempts with released results and use the action button to edit the result visibility.

A modal will display to select the visibility settings for the selected attempt, these settings can be changed afterwards to support temporary results release.
Result pages visible to candidates: Users will be able to view the results pages that have been configured for their exam attempt.
Score visible to candidates: Users will be able to see their score for the exam across tables on their insights and other areas score is displayed. Note this does not apply to the score metric box on the results page.

Use the result visibility column for an overview of the different result states for the attempts.

Visible
Both score in tables and the results pages are visible to the candidate
Results only
Only the results page is visible to the student
Score only
Only the score shows to users on tables (insights attempt tables)
Hidden
Neither score or results pages are visible to users
When score or results pages are hidden Admins, Managers and educators will still be able to see these pages (with the required permissions for educators) but they will be hidden from students. Previous links to students. Any saved links to results pages that are set to hidden will show candidates the below hidden page state

Candidate insights pages will still use scores to calculate averages even when hidden. But the specific scores per attempt will be hidden.

Exporting Results
On any exam navigate to the attempts page to find the attempts table for those attempts. From here filter, sort and organise your attempts ready for export. Learn more in our Attempts table docs below
Attempts table & exportsQuestion stats
Once attempts have been released in the exam, you can go to the bottom 'Question' tab (under the 'Manage' header) to view detailed, question by question, performance statistics. This allows you to delve deeper into response breakdowns to uncover common misconceptions, providing you with the insights necessary to address these challenges and facilitate student comprehension.

Learn more about Synap's question statistics page below
Exam statisticsView results
Attempt result pages can be viewed as soon as marks are completed (moderators have finished and submitted the marks). From the attempt management table any results in a completed, finalised, or released state, click on the current score in the score column then view as educator to view.

Alternatively navigate to any user>progress page and view results from the users history table.

Learn more about results pages below
ResultsLast updated
Was this helpful?